How to Set Up a Test Kubernetes Cluster from Scratch
Sharad Regoti

Kubernetes is the go-to platform for managing containerized workloads, offering scalability and flexibility that developers and ops teams love. Setting up a test Kubernetes cluster from scratch might sound daunting, but it’s a great way to learn the ropes and experiment without risking production environments.
If you're a solutions architect, developer, platform engineer, or operator who wants to understand the building blocks of Kubernetes while setting up a functional test cluster, this guide is for you.
We’ll walk through:
What goes into a full Kubernetes setup
Key differences between production and test clusters
How to spin up a working environment using K3s
Production Cluster vs Test Cluster: What’s the Difference?
Setting up a production Kubernetes cluster involves careful planning for high availability (HA), scalability, security, and performance. Test clusters, however, prioritize ease of setup and speed over robustness.
Production Cluster Considerations:
A production-ready setup includes several layers of redundancy and fault tolerance to ensure stability under real-world load. Let’s take a closer look at what goes into it.
Highly Available State Store (etcd)
Kubernetes relies on ETCD for storing its state. To ensure HA and data consistency, etcd runs as a cluster. A 3 or 5-member etcd cluster is recommended. This provides quorum – the minimum number (n/2) + 1 of members needed for the distributed system to make decisions and avoid "split-brain" scenarios.
3 etcd Members: Quorum = (3/2) + 1 = 2. Tolerates 1 etcd member failure.
5 etcd Members: Quorum = (5/2) + 1 = 3. Tolerates 2 etcd member failures.
Why not more? While tolerating more failures seems appealing, etcd performance (write latency) degrades as more members are added due to the consensus protocol overhead. Clusters larger than 5 members are generally discouraged for performance reasons. Refer this guide on optimal ETCD cluster size
Highly Available Control Plane Services
The components like kube-apiserver, kube-scheduler, and kube-controller-manager also need redundancy. This is achieved by running multiple instances of these services on different machines, typically referred to as control plane nodes. These services often use leader election mechanisms among themselves.
Relating Control Plane Nodes and ETCD
There are two main ways to deploy etcd alongside control plane services:
Stacked (Colocated) ETCD: ETCD members run directly on the control plane nodes. In this common setup, the number of ETCD nodes directly determines the control plane size. This simplifies setup but tightly couples control plane load and etcd performance.
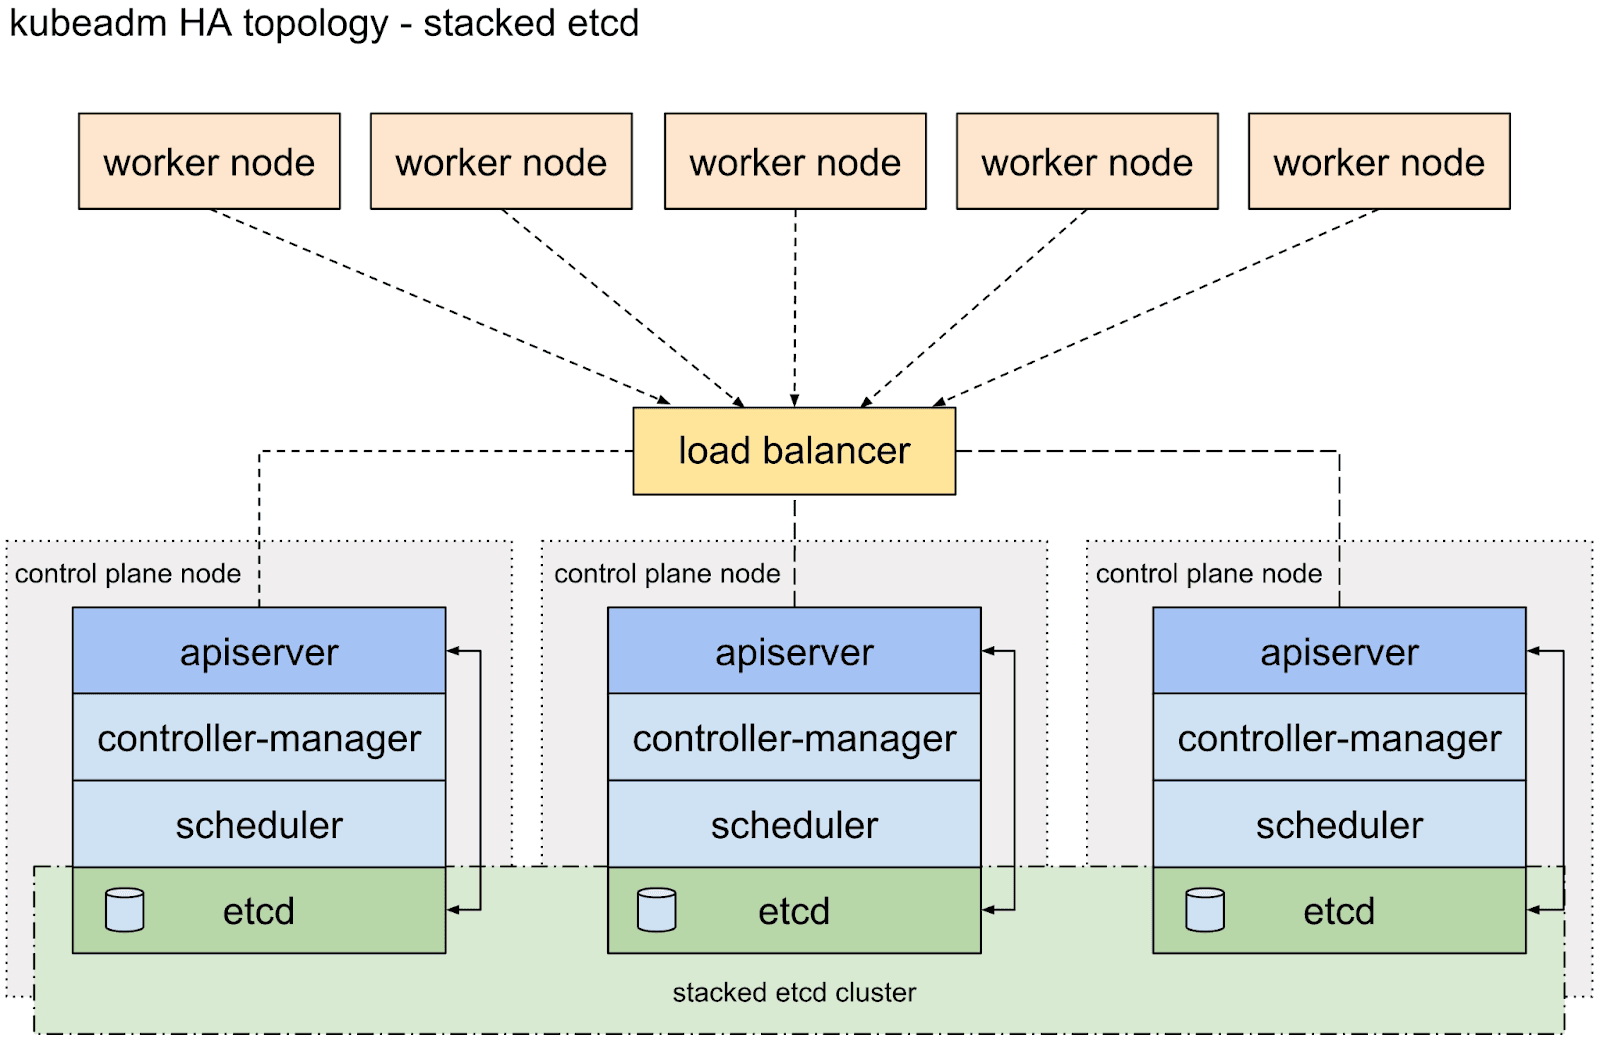
External etcd: The etcd cluster runs on dedicated machines, separate from the control plane nodes. You still typically run a 3 or 5-member etcd cluster for the reasons above. You would also run multiple control plane nodes (e.g., 3 or more) connecting to this external etcd cluster for API server availability. This provides better isolation and potentially better etcd performance but requires managing more infrastructure.
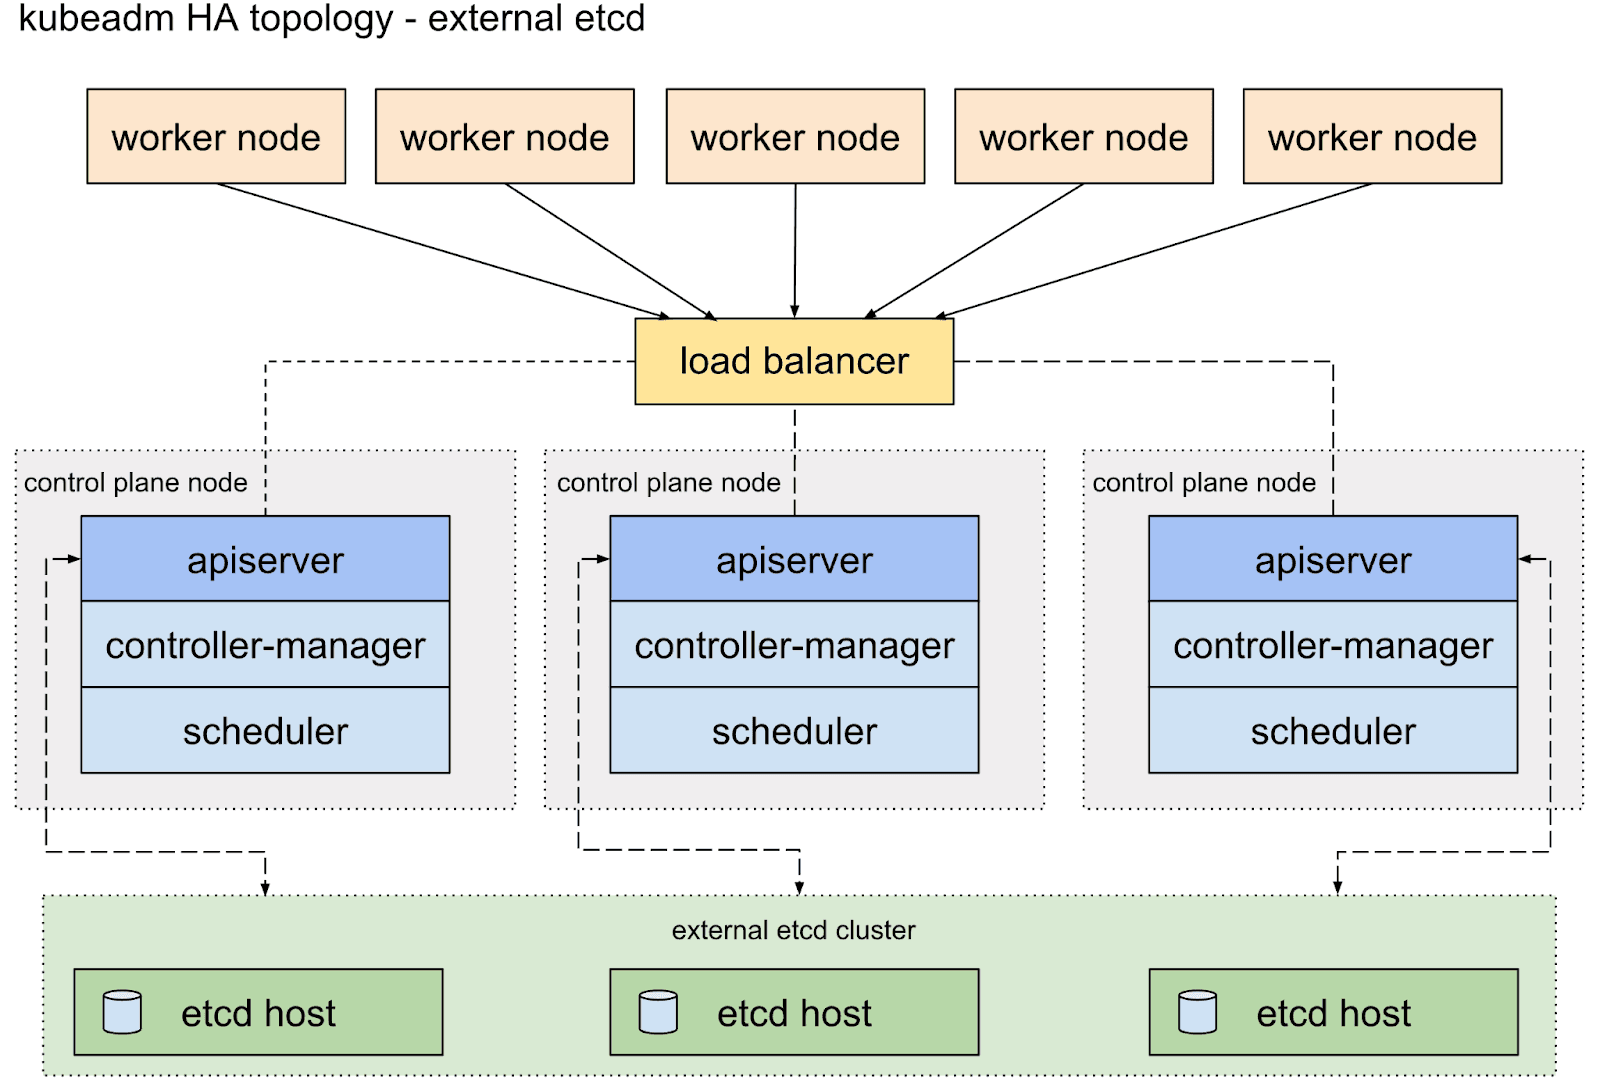
Multiple Control Plane Nodes
Usually, 3 or 5 control plane nodes are recommended. This ensures a quorum – the minimum number of members needed for the distributed system to function correctly.
Additional Production Considerations:
Scalability: Designed to handle many worker nodes and large application loads.
Security: Requires robust network policies, RBAC, secrets management, certificate rotation, etc.
Maintenance: Needs careful planning for upgrades, backups, and monitoring.
Test Cluster Considerations:
Test clusters are much simpler by design. They’re often ephemeral and built to run locally or in lightweight environments.
Key differences include:
Simplicity: Often runs on a single node (combining control plane and worker roles) or uses lightweight tools.
Temporariness: Frequently created and destroyed for specific testing tasks.
Lower Resource Needs: Designed to run on a laptop or a small VM.
Relaxed HA/Security: High availability and complex security configurations are usually not primary concerns. The focus is on the functional correctness of applications within Kubernetes.
For this guide, we’ll focus on setting up a test cluster, prioritizing speed and simplicity over production-grade resilience. The next section will explore the steps involved in setting up a simple Kubernetes cluster from scratch.
What goes into setting up a Kubernetes Cluster?
Understanding the manual steps involved, even for a minimal cluster (1 control plane node, one worker node), provides valuable insight into Kubernetes fundamentals. Here are the stages involved:
1. Provision the Infrastructure
The process begins with provisioning the necessary infrastructure, separate virtual machines for the control plane and worker nodes, and carefully configuring networking and firewall rules between them to allow communication pathways for components like the API server and Kubelet.
2. Generate Certificates
Alongside this, a crucial and error-prone phase involves creating a Certificate Authority (CA) and generating numerous TLS certificates. These certificates are vital for securing communication between every component, including etcd, the API server, kubelets, controllers, scheduler, and proxy, and must be securely distributed to the correct nodes.
3. Install and Configure Core Components
The next stage involves bootstrapping the core components. This means installing and configuring the etcd key-value store on the control plane node to hold the cluster state.
Then, the control plane services (API server, scheduler, controller manager) must be installed and configured to talk to etcd and each other using the generated certificates. Simultaneously, the worker node needs its container runtime, kubelet, and kube-proxy installed and configured to register securely with the control plane's API server.
4. Deploy Networking and Add-ons
Finally, essential cluster add-ons like the Container Network Interface (CNI) plugin for Pod networking and CoreDNS for service discovery must be deployed, and administrative access must be configured via kubectl. Each step requires precise configuration, making the manual process intricate and time-consuming.
This is just a high-level overview of the manual steps involved in setting up a Kubernetes cluster from scratch.
As you can see, this involves many intricate steps, requiring careful configuration of security credentials, networking, and component interactions. It's a fantastic learning experience, but time-consuming and error-prone for daily testing needs.
Kubernetes Cluster Setup Tools (Simpler Than Manual Setup)
Thankfully, we don't have to do everything manually whenever we need a test cluster. Several tools automate this bootstrapping process, making it much faster and easier.
Here are a few options we recommend:
Minikube: Creates a single-node Kubernetes cluster inside a VM (like VirtualBox, Hyper-V) or a container on your local machine. Great for basic application development and learning.
Kind (Kubernetes in Docker): Runs Kubernetes cluster nodes as Docker containers. Excellent for testing Kubernetes features, operators, or multi-node scenarios locally. [3]
K3d: A lightweight wrapper to run K3s (see below) in Docker. Makes it easy to create multi-node K3s clusters quickly.
K3s: A lightweight, fully conformant Kubernetes distribution. It comes as a single binary (<100MB), reduces dependencies, and simplifies installation. Ideal for edge, IoT, CI/CD, and development/test clusters.
We will use K3s for this guide because it's incredibly fast to set up, has minimal resource requirements, and provides a fully functional Kubernetes environment perfect for our single-node test cluster goal.
How to Set Up a Test Kubernetes Cluster with K3s
Let's get our hands dirty and set up a single-node K3s cluster. This will act as both the control plane and the worker node.
Prerequisites:
Linux or Mac machine.
Root or sudo access.
Curl or wget is installed.
Installation Steps:
Prepare Your Environment (macOS Users Only)
(Linux users: You can skip this step and proceed directly to Step 2).
Kubernetes, including K3s, runs its core components as Linux processes that rely on specific Linux kernel features. macOS has a different kernel (Darwin) and doesn't natively support these requirements. Therefore, to run K3s on a Mac, we need to create a Linux environment first. We can achieve this using a Virtual Machine (VM). For this guide, we'll use Multipass, a lightweight VM manager.
Open your macOS Terminal and use Homebrew to install Multipass:
Now, use Multipass to create and start a new Ubuntu Linux VM. We'll name it k3s and allocate some memory and disk space suitable for testing:
Check the status of your new VM, look for the State field in the output. It should say Running.
To install K3s, you need to work inside the Linux VM you just created. Access its command line using:
Your terminal prompt should change, indicating you are now logged into the k3s Ubuntu VM (e.g., ubuntu@k3s:~$).
macOS users: You have now successfully set up and accessed your Linux VM environment. All subsequent steps in this guide should be executed inside this Multipass VM shell.
Run the K3s Installation Script:
The easiest way to install K3s as a server (control plane + node) is using the official installation script:
This command automates the complex setup process we previously outlined. Behind the scenes, the script handles the tedious tasks of generating a Certificate Authority (CA) and all necessary TLS certificates for secure communication between components.
For this single node setup, it replaces the complex ETCD datastore with an embedded SQLite database, simplifying configuration and reducing resource needs. It also downloads the lightweight K3s binary, which packages the core control plane services (API server, scheduler, controller manager), and configures them to run correctly.
The K3s binary includes the worker components (Kubelet, Kube-proxy) and runs them on the same node in this default server mode, effectively creating a combined control-plane and worker node instantly. The script ensures essential add-ons like the Flannel CNI plugin (for Pod networking) and CoreDNS (for service discovery) are automatically deployed.
Finally, it generates a ready-to-use kubeconfig file (/etc/rancher/k3s/k3s.yaml), allowing you to interact with your cluster via kubectl.
This shell script is designed to perform most of the manual steps we discussed.
Check K3s Service Status:
Verify that the K3s service is running:
You should see output indicating the service is active (running). Press Q to exit the window.
Configure kubectl:
K3s automatically creates a kubeconfig file at /etc/rancher/k3s/k3s.yaml. This file contains the credentials needed to access your cluster. To use kubectl, you need to tell it where this file is. You have a couple of options:
Option A (Recommended for testing): Set the KUBECONFIG environment variable (add this to your .bashrc or .zshrc for persistence):
Option B: Copy the K3s config file to the default kubectl location:
Verify Cluster Access:
Now, use kubectl to interact with your cluster. Let's check the nodes:
You should see output similar to this, indicating your single node is ready:
Congratulations! You now have a functional single-node Kubernetes cluster running with K3s.
Maintenance / Things to Take Care Of (for K3s Test Clusters)
Even for a simple test cluster, keep these points in mind:
Upgrading K3s: Upgrading is typically as simple as re-running the installation script. K3s handles the upgrade process gracefully. Check the official K3s documentation for specific version upgrade paths if needed.
Checking Logs: If something goes wrong, check the K3s service logs:
Resource Usage: K3s is lightweight, but keep an eye on CPU, memory, and disk usage on your node, especially if you deploy many applications.
Cleaning Up / Uninstalling: When you're done with the cluster, K3s provides an uninstall script:
What You Learned (and Where to Go Next)
We’ve walked through setting up a test Kubernetes cluster from scratch using k3s, covering architecture basics, manual setup steps, and a streamlined tool-based approach. You now have a lightweight, single-node cluster perfect for experimenting with deployments or learning Kubernetes’ internals. While production clusters demand more complexity, this test setup gives you a solid foundation to build on.
If you’re looking to simplify cluster management and streamline your GitOps workflows, that’s where we come in.
Explore the Akuity Platform to see how we help teams move faster with Kubernetes—without the manual overhead.
Frequently Asked Questions About Setting Up a Test Kubernetes Cluster
How can I test a Kubernetes cluster for functionality and reliability?
You can test a Kubernetes cluster by setting up a test environment, deploying your application, and running automated tests using Akuity. Akuity allows you to validate deployments, perform end-to-end workflows, and monitor cluster health directly within the Kubernetes environment.
What are the best practices for setting up a Kubernetes cluster for testing?
Provision a test cluster locally with tools like kind or in the cloud with services such as EKS or GKE, deploy your application using manifests or Helm charts, and ensure the test environment closely mirrors production. Then, run automated validation, resilience, and load tests to confirm the cluster’s performance and reliability.
With Akuity, you can automate validation, monitor resilience, and ensure the test environment mirrors production to reliably test your cluster’s functionality and performance.
How do I build my own Kubernetes cluster from scratch?
To build your own Kubernetes cluster, start by provisioning your nodes, either on physical machines, virtual machines, or cloud instances. Install a container runtime like Docker or containerd on each node, then set up Kubernetes components such as kube-apiserver, kube-controller-manager, and kubelet. Use tools like kubeadm to initialize the control plane and join worker nodes to the cluster. Once set up, verify the cluster is running correctly by checking node status and deploying a test application.
What tools and best practices should I follow to build your own Kubernetes cluster?
When building your own Kubernetes cluster, tools like kubeadm, kind, or k3s simplify cluster creation and management. Follow best practices by separating control plane and worker nodes, configuring proper networking (CNI plugins), and enabling role-based access control (RBAC) for security. Once your cluster is running, Akuity can help manage deployments, monitor cluster health, and integrate GitOps workflows to ensure consistency and compliance. Consistently test your cluster by deploying sample applications and monitoring resource usage, and keep your cluster configuration versioned in Git using IaC (Infrastructure as Code) for reproducibility and easier maintenance.
